min read
Confidential Computing


In my previous blog, I spoke about why we need KDS – Key Derivation Service. Now in this blog, let's dive into the technical details of KDS. I will divide my blog into three parts:
There will be scenarios where you want to move to another physical machine. There can also be a situation where the CPU breaks down, and you want to move your enclave data onto a different physical system. To start the computation from where you left off on this new system, you must access the previous enclave data/state.
Hence the need for enclave data persistence arises. Persisting enclave data to external storage allows us to migrate this data to different physical storage and start the enclave processing from where we last left off. By default, Conclave uses the sealing key (bound to a specific CPU) for persisting enclave data. Persistent data must be encrypted and stored so that the enclave data is not attached to one particular physical system. That’s where we use KDS, which is a Key Derivation Service. The application enclave can request a stable key from this service and can use this key to encrypt the enclave data before persisting to external storage.
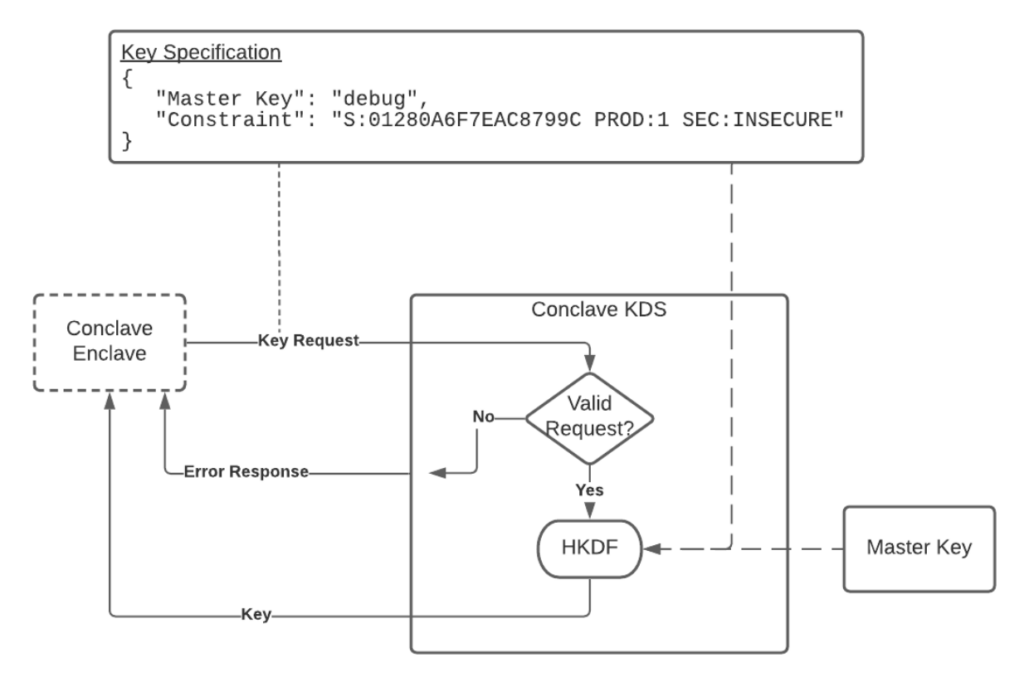
KDS derives the key from a master key. This master key can be a key stored in an HSM, Azure KMS, or it can be a hardcoded debug key. For the 1.2 release, there is only one master key that KDS provides, and this is hardcoded in KDS and is called the DEBUG key.
Conclave KDS is itself deployed as an enclave, making it easy for both your application and Conclave KDS to remote attest to each other before talking to each other.
The key derivation logic of KDS depends on the parameters provided by your application enclave. As an enclave developer, you are in complete control of which enclaves can access this key. You can enforce constraints and give only a specific enclave (having a particular code hash) access to this key or allow all the enclaves signed by a particular entity/organization to access this key. These parameters are the key specifications that you can see in the above diagram. Your enclave can also specify the type of master key you wish the key to be derived from. As mentioned, for this release, we only have the option of using a hardcoded DEBUG key.
To ensure that only an enclave with a specific hash value can access this key, use the below key specification. For this scenario, upgrading the enclave will change the enclave code hash, and hence the new enclave will not be able to use the old persisted data.
PolicyConstraint keyConstraint = new PolicyConstraint().useOwnCodeHash();
To allow any enclave signed by a particular entity to access this key, use the below key specification. Upgrading the enclave is also possible, and the new version of the enclave can still access the old persisted data.
PolicyConstraint keyConstraint = new PolicyConstraint().useOwnCodeSignerAndProductID()
PolicyConstraint is a wrapper around our usual EnclaveConstraint class. You can even enforce a security level–for example, you can say that any enclave that wants to access this key must have the specified security (SECURE/INSECURE/STALE). Read more here.
PolicyConstraint keyConstraint = new PolicyConstraint().getEnclaveConstraint().setMinSecurityLevel(EnclaveSecurityInfo.Summary.SECURE)
There are a few more specifications that you can enforce; you can read about them here.
You have to define this key specification inside your application enclave code itself. When you build your enclave, you get an enclave code hash. Changing the key specification will change this enclave’s code hash. Each time an enclave requests access to a key from KDS, as long as the parameters are the same, the same stable key will be returned by the KDS.
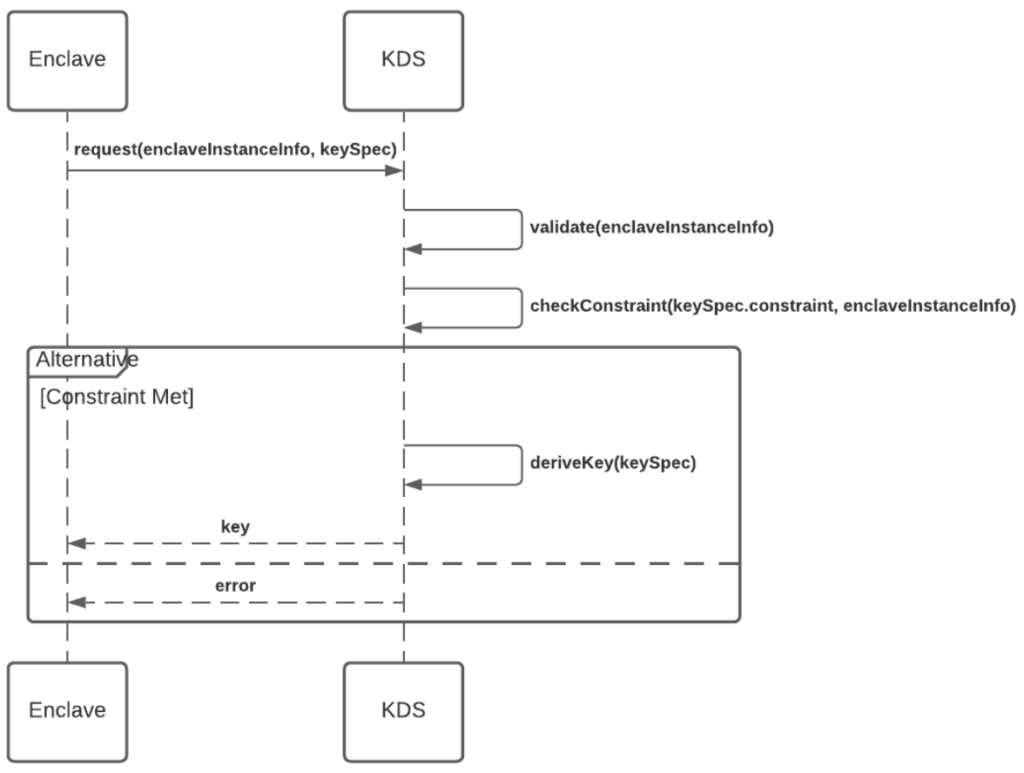
The above diagram shows a typical flow when an application enclave requests a key for use from the KDS. The application enclave sends its remote attestation object with the key specification to the KDS. KDS verifies the remote attestation object and the key specification. If the key specification matches with the enclave details, a key is derived by KDS and is released to the enclave. This key is encrypted using the public key received from the enclave’s remote attestation object, hence only the enclave can access this key. The enclave first verifies the remote attestation object of the KDS. The KDS constraint can also be added to the key specification at the time of building the enclave. Usually, the code hash of KDS is added as the KDS constraint, as we know at the time of building our application what the code hash of the deployed KDS service onto the enclave is. This can be added using the kdsEnclaveConstraint parameter as shown below in part 3.
Once the enclave verifies the KDS’s remote attestation object, it can decrypt the key and use it to persist any of its computations.
Use the below steps to write and start a Conclave application using KDS.
Let us add the key specification and KDS enclave constraint to our application enclave. You can do this by overriding the kdsConfig method in the enclave class.
conclave {
...
kds {
kdsEnclaveConstraint = "S:4924CA3A9C8241A3C0AA1A24A407AA86401D2B79FA9FF84932DA798A942166D4 PROD:1 SEC:STALE"
keySpec {
masterKeyType = "debug"
policyConstraint {
constraint = ""
useOwnCodeHash = (true|false) // Optional
useOwnCodeSignerAndProductID = (true|false) // Optional
}
}
}
...
}
If you are using the web host, then you can specify the KDS connection parameters on the command line when starting your service.
--kds.url=https://kds.dev.conclave.cloud
--kds.connection.timeout.seconds=60
Otherwise, if you are developing your own host application you use KDSConfiguration to specify these parameters then pass the configuration to EnclaveHost.start.
import com.r3.conclave.host.kds.KDSConfiguration;
...
KDSConfiguration kdsConfiguration = new KDSConfiguration("https://kds.dev.conclave.cloud");
EnclaveHost enclaveHost = EnclaveHost.load("com.example.MyEnclave");
enclaveHost.start(null, null, null, kdsConfiguration) {}
We will enable persistence by adding the below parameter to the enclave’s build.gradle.
conclave {
productID = 1
revocationLevel = 0
persistentFileSystemSize = "64m"
....
}
Let’s now start our host (conclave-web-host) and connect to KDS. We will start the host in simulation mode.
./gradlew clean host:shadowJar -PenclaveMode=simulation
If you are on a Mac, set up a Linux environment to run the Conclave application. If you are on Linux, you can skip this step.
./gradlew enclave:setupLinuxExecEnvironment
Start the Docker container.
docker run -it --rm -p 8080:8080 -v ${PWD}:/project -w /project conclave-build /bin/bash
Run the host application by pasting in the URL and the timeout to the KDS service.
java -jar host/build/libs/host-simulation.jar --filesystem.file=host/scratch.txt --kds.url=https://kds.dev.conclave.cloud --kds.connection.timeout.secconds=60
KDS service is deployed at the URL mentioned above. Note: This URL is for a public preview of the KDS service, and this URL might change later.
Below are some helpful resources to learn more about Conclave and Confidential Computing.
The latest news and announcements about Conclave.


Financial institutions continue to face a dilemma when dealing with fraud — confidential computing could be the solution they are looking for.
